Find links to all the posts related to this project here
Next in line is Bunny's Tail.
2. The tail :

I have selected a dark brown color to stitch the tail.
The circular tail is stitched using Reverse herring bone stitch to give the shadow appearance.
I am posting all the steps in pictures below.
The thread used here is for illustrative purposes only . I am using 2 strands of DMC 6 strands thread for The Bunny Project
First one half of the circle is filled and then the next half .
So, we start in the center and work towards the sides.


The last stitch of one half of the circle

One half has been stitched using Shadow Embroidery

Starting the second half


The Shadow work completed on the circle

Back side of the work/ fabriC.
Weave the loose into the stitches on wrong side so as to avoid the loose end being visible from the front.

The tail of the bunny is now finished

You are welcome to join me if you want to stitch along .
2. The tail :

I have selected a dark brown color to stitch the tail.
The circular tail is stitched using Reverse herring bone stitch to give the shadow appearance.
I am posting all the steps in pictures below.
The thread used here is for illustrative purposes only . I am using 2 strands of DMC 6 strands thread for The Bunny Project
First one half of the circle is filled and then the next half .
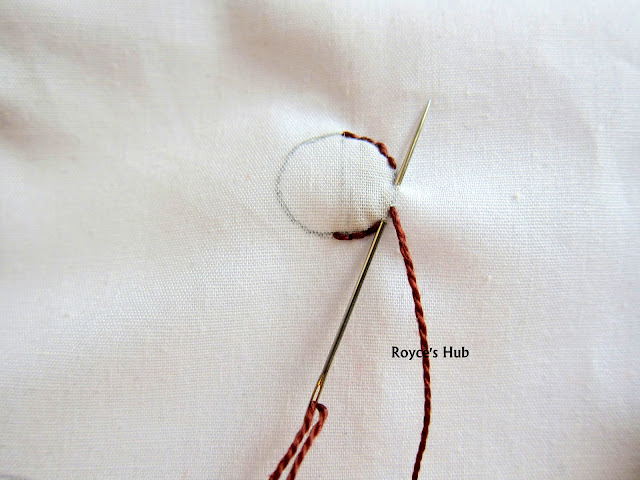
So, we start in the center and work towards the sides.

Now , we start the Reverse Herringbone or the Double back stitch on the right side of the fabric


The last stitch of one half of the circle

One half has been stitched using Shadow Embroidery

Starting the second half

Continue stitching in the similar way as the first half


The last stitch of the second half

The Shadow work completed on the circle

Back side of the work/ fabriC.
Weave the loose into the stitches on wrong side so as to avoid the loose end being visible from the front.

The tail of the bunny is now finished

Happy Stitching.
Thanks for the tutorial. I'm hoping to get started this weekend but i have a few other things to do first!
ReplyDeleteVery useful tips and suggestions.
ReplyDelete