Showing posts with label Recycle. Show all posts

Sunday, 9 January 2022

Rag to a Bag


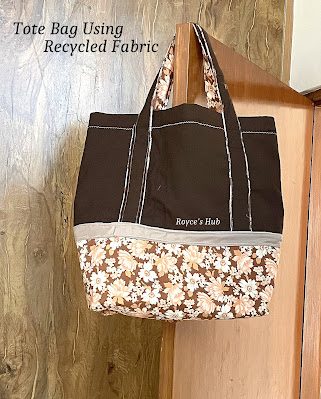
Tote Bag from old clothes

 After the year end purging, I got a lot of old fabric that could'nt be donated. As, I did'nt want to discard these, I came up up with this idea to bring it to use.

Making a tote bag was really useful for the grocery shopping. It's a sturdy bag that can carry a lot of things.
I love it!!!

Happy Recycling....


Friday, 7 January 2022

Pencil Shavings Reused...

Pencil Shavings Art / Best out of waste

Pencil shavings waste Recycled


A beautiful piece of art made out of pencil shavings . The Flower vase , creepers and leaves painted with poster colours give it a realistic look.

This is made for my kid's school project. 

Happy Crafting !!


Sunday, 22 May 2016

23 Creative Ways To Reuse Old Plastic Bottles


Wednesday, 27 January 2016

Rail Fence Quilt Block and Rug


Long strips of fabric scrap can be sewn together to get a really mesmerizing quilt block. Rail Fence quilt block is an easy to make quilt block, at least that's what I thought until i started making it with the most primitive methods available.

Ideally the rail fence design is made by sewing together 3 long strips of different fabrics and then re-cutting this band into squares. These squares are then arranged such that the strips form beautiful pattern and then sewn together to make a block.


I made this rug using strips cut from cotton pants and not 'so' cotton pinafore of my daughter. So, after a long time some recycling going on ...

What made the work easier was the firmness of the cotton pant even though the pinafore material was not very easy to work with.

Only the top part is done but worth showing off......... 


One way of making the block is to cut individual strips( what I preferred) to make a block.
Another method is to sew together long strips and then cut off blocks from it.


   Piece measures 1x 5 inches without seam allowance  


5 " finished blocks that actually measure 5 1/2 inches


More blocks ready to be sewn together


Gearing up to finish it as soon as possible. 

Update :

Added up one more column to the rug as this was lacking 'something'
 So, now it looks like this...


I used an old towel to make the backing.  


Cutting the thick edges help in easier stitching while joining the top and the backing.


I then folded the towel so as to get enough length and breadth to match the quilt top. 
The edges are raw and the fabric doesn't seem to fray much, so, I just left it the way it is now.


Saturday, 17 January 2015

DIY Kid's Craft Using Plastic Bottle : A ladybug


My daughter made some of it in the school and we modified it by adding the wings antennae and those eyes.

Isn't the ladybug cute.


Materials used

  • Plastic water bottle ( bottom part, the cap and curved side for the wings )
  • Poster colors (Black, white and red )
  • Small piece of newspaper for the antennae.
  • Glue ( anything that sticks plastics)


Method

Cut the bottom part of the plastic bottle long enough that the cap of the bottle can be fixed easily on one side.

Cut the wings from the top curved portion of the bottle and shape it accordingly.

Paint the inner surface of the body parts with red poster color . Let it dry properly.
Add black dots on the outer surface of the plastic .
Paint the cap with black poster color.
Paint the eyes
Roll the newspaper tightly and fold and stick one side ( as seen in the picture) to resemble antenna. Paint the antennae with black color and stick it on the head using glue. 

Glue the parts together.

The ladybug is ready..........


Monday, 1 July 2013

My First Quilt


Materials Used:

Fabric obtained from old T- shirts
Batting (from old pillows)
Bed sheet for the backing
Sewing Machine ( I used the regular sewing machine , as it was a small quilt)


I had an idea of recycling my kids' clothes ,especially the T-shirts, as there were loads of these packed into a bundle and enjoying the security of a box and consuming lots of space.


I cut the shirts so as to get those areas that I could use to make a quilt.
There were many square and rectangular pieces.
First I sewed all the pieces together to make the quilt facing. Then a sandwich of this with the batting and a besheet used for the backing.


The quilt is ready.......

I am making a tutorial on how I made this quilt , but will be posted only after the summer holidays.

Happy Holidays !


Monday, 14 January 2013

Hand Applique Using Blanket Stitch - A Tutorial


Materials Required:

1. Main / Backing fabric
2. Fabric scraps for the applique
3. Design template
4. Fusible web (optional)- I have used the web obtained from the boys cap while recycling it.
5. Needle and Embroidery floss
6. Stick glue Adhesive


Steps:

1. Apply the glue lightly on the template. 


Place it on the back side of the fabric scrap and press . Take care that the fabric is taut and not folded or loose anywhere.

Cut out the design carefully. 

I find this method easier than drawing the design on the fabric and then cutting it, as with this method the fabric is firmer while cutting out the design and saves time taken to draw the design on fabric.


Now peel off the fabric very carefully and slowly from the template  so as not to damage or fray the sides of the fabric. I have found this glue not very sticky hence doesn't hold the fabric very strong against the template when applied in moderate quantity. 

Do not leave the fabric glued to the template for a long time.


I got this web while recycling a cap, and found that it could stick the fabrics together when ironed.

Cut out the web along the borders of the design carefully.
Using a web is optional.


Stick the applique to the main fabric using Iron on method if you are using a fusible web or use the stick glue to adhere the applique directly to the main fabric.


Use an embroidery hoop and start with the Blanket stitch.


First stitch in place and working the second stitch.


Note the stitch place at the groove.
Keep the stitches at equal distance from each other.
While stitching in curves slant the stitches appropriately to get a uniform stitching.


DONE!!!


Back side of the fabric


 Happy Stitching!!!!


Sunday, 23 September 2012

Rug Made Out Of T - Yarn


I crocheted a Rug using the T - Yarn that I made out of old T shirts


Materials Used :

T yarn (here)
10mm crochet hook
Sewing thread and needle

I have used double crochet stitch through out.

Foundation chain : any number depending on the width of the rug required. Keep in mind that the finished product will be longer than the foundation chain

Row 1 : DC in 3rd chain from the hook, DC across
Row 2 : Ch3, Dc in 1st Dc , DC across, 
Row 3 and subsequent Rows: repeat Row 2


Happy Recycling!!!!!!


Friday, 21 September 2012

How I Made The T-Yarn

An old T shirt that had to be recycled.
I have cut around 3 T - shirts before I got the technique right.

Requirements

The T shirt should be seamless, that is , not stitched on sides.


Carefully cut over the line joining the arm holes, A measuring tape can be placed over the T shirt joining the arm holes to aid in cutting.


I cut the bottom part along the stitch so as to get the width proper.


Fold the cut T shirt leaving the bottom flap an inch or little more extra.


Start cutting the T shirt into strips of equal width, so as to maintain uniform yarn thickness throughout.

One method that I used to get equal width throughout is by placing the long strip obtained by cutting the bottom part of T shirt over the original cloth as shown below.

While cutting the last few strips adjust the width by cutting few millimeters more or less so as to get almost the same width.

In case you need thinner yarn , cut the strips more narrower.


The T shirt has been cut into strips


The T shirt unfolded after cutting it into strips.
You can see that the top one inch is uncut.


I placed a thick plastic carry bag between the two flaps where next stage of cutting has to be done.


Closer view


The first cut is made like this,


Next cut,


Complete cutting across


To form the strip into a yarn , pull the yarn holding the two sides


Want to see what I used this yarn for . Check it out here