
Tuesday, 25 December 2012
Wednesday, 28 November 2012

Wednesday, 14 November 2012
Crochet Snowflake III
This is yet another beautiful snowflake .
You can get the free pattern to make this snowflake here.

Happy Crocheting !!!
You can get the free pattern to make this snowflake here.

Happy Crocheting !!!
Tuesday, 13 November 2012
Crochet Snowflake II
This is another snowflake. Isn't it awesome.
You can get the free pattern for this crochet snowflake here.

Happy Crocheting.
You can get the free pattern for this crochet snowflake here.

Happy Crocheting.
Monday, 12 November 2012

Sunday, 23 September 2012
Rug Made Out Of T - Yarn

I crocheted a Rug using the T - Yarn that I made out of old T shirts

Materials Used :
T yarn (here)
10mm crochet hook
Sewing thread and needle
I have used double crochet stitch through out.
Foundation chain : any number depending on the width of the rug required. Keep in mind that the finished product will be longer than the foundation chain
Row 1 : DC in 3rd chain from the hook, DC across
Row 2 : Ch3, Dc in 1st Dc , DC across,
Row 3 and subsequent Rows: repeat Row 2

Happy Recycling!!!!!!
Friday, 21 September 2012
How I Made The T-Yarn
An old T shirt that had to be recycled.
I have cut around 3 T - shirts before I got the technique right.
Requirements :
The T shirt should be seamless, that is , not stitched on sides.

Carefully cut over the line joining the arm holes, A measuring tape can be placed over the T shirt joining the arm holes to aid in cutting.

I cut the bottom part along the stitch so as to get the width proper.

Fold the cut T shirt leaving the bottom flap an inch or little more extra.

Start cutting the T shirt into strips of equal width, so as to maintain uniform yarn thickness throughout.
One method that I used to get equal width throughout is by placing the long strip obtained by cutting the bottom part of T shirt over the original cloth as shown below.
While cutting the last few strips adjust the width by cutting few millimeters more or less so as to get almost the same width.
In case you need thinner yarn , cut the strips more narrower.

The T shirt has been cut into strips

The T shirt unfolded after cutting it into strips.
You can see that the top one inch is uncut.

I placed a thick plastic carry bag between the two flaps where next stage of cutting has to be done.

Closer view

The first cut is made like this,

Next cut,

Complete cutting across

To form the strip into a yarn , pull the yarn holding the two sides


Want to see what I used this yarn for . Check it out here
Tuesday, 18 September 2012

Monday, 10 September 2012
Name this Applique Work

This is an applique work that I did when I was in school. We were told that it was a kind of applique work and I never bothered to know more about its origin and the name. My zeal to know more about this has brought this work here.

I searched on net for this kind of embroidery and could find that it is an Indian kind of embroidery.
It would be very nice if anyone could give me the details on this form of embroidery.
The obvious features of this Applique work are that,
- The background fabric is red ( or bright in color).
- The applique is done with black fabric .
- Chain stitch with white thread is used to fix the applique to the base.
Monday, 3 September 2012
I am Growing Mint

No,this is not what I had been doing for more than a month now. I was away on vacation from where I got little mint plants. The climate in Abu Dhabi makes it very difficult to grow plants and they require utmost care.
I planted the mint plants in this pot 2 weeks back, but, all those got dried and were almost dead.Believe it or not, Mint is a herb that can grow like a weed if it gets good sunshine and water.
To my surprise, tiny plants started erupting from the stems that were under the soil , as can be seen in the picture above that there are no mother plants.
After few days , even the dry mother plants started giving off tiny leaves.

Wednesday, 11 July 2012
Cutwork Embroidery Project Completed
Find all the posts related to Cutwork Embroidery andthe Tutorial here
OR
Follow the links below
1. Stitching the buttonhole bar
2. Stitching the cut edges
3. Completed Cutwork
OR
Follow the links below
1. Stitching the buttonhole bar
2. Stitching the cut edges
3. Completed Cutwork
Here is the finished Cutwork Embroidery Project .

The stems have been worked with stem stitch and the leaves with satin stitch .
Tuesday, 10 July 2012
Cutwork Embroidery : Stitching The Cut Edges
This post is a continuation of Cutwork Embroidery Project : Buttonhole Bar
Find all the posts related to Cutwork embroidery here
Next step is to cut the fabric as shown in the graphic below without damaging the buttonhole bars above.


Work the Buttonhole Stitch across the edge to finish. The above picture shows the finished work on one side.
Find all the posts related to Cutwork embroidery here
Next step is to cut the fabric as shown in the graphic below without damaging the buttonhole bars above.


The small cuts across the raw edge helps to relieve tension over the edges when the fabric is folded inwards.


Start stitching the raw edges with Tailor's Buttonhole Stitch folding the fabric inwards at the line formed by running stitch.
Check the link for correct stitch instructions.

Check the insertion of needle at the start of the stitch. But , pull the needle and thread in the opposite direction towards right side to get a proper knot at the edge.
The black pen mark around the border that can be seen is drawn to have uniform width of the stitch.
The black pen mark around the border that can be seen is drawn to have uniform width of the stitch.

Work the Buttonhole Stitch across the edge to finish. The above picture shows the finished work on one side.
Monday, 9 July 2012
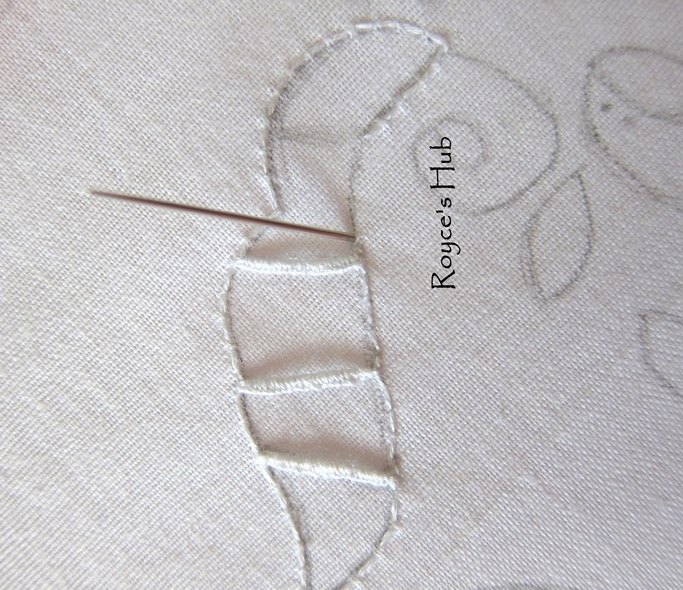
Cutwork Embroidery Project : Buttonhole Bar
Cutwork Embroidery is made up of mainly buttonhole bars , eyelets and the cut, raw borders secured with buttonhole stitch or satin stitch. I am using the buttonhole stitch exclusively for this project. The design used is very suitable for first timers (I am one among them) with just buttonhole bars and buttonhole borders.
Here is a pictorial presentation of the cutwork embroidery here.


 You can see in the above picture how the needle is taken under the fabric after finishing the buttonhole bar ,so the the bar remains straight. Continue stitching as shown below.

Continue stitching the running stitch over the border as done before till another bar is reached.

Next post will be on how to cut the fabric and secure the borders with buttonhole stitch.
See all the posts related to Cutwork Embroidery here
Here is a pictorial presentation of the cutwork embroidery here.

The design I have used is very simple.
Stitch the running stitch on one edge of the open space starting at 'A'.
Stitch the running stitch on one edge of the open space starting at 'A'.
Continue stitching around till the first bar is reached. The stitch should be such that the stitches on front should be longer than that on the wrong side of the fabric . This is called the darning stitch


See how the last running stitch is made covering the bar, before the first buttonhole bar is started.

When you reach a crossbar, stitch across the opposite edge of space.
You can see the needle going under the two stitches on the two opposite edges.
You can see the needle going under the two stitches on the two opposite edges.

Bring back the needle under the stitch on opposite edge only.

In a similar manner make the third cross stitch for first cross bar, taking the needle under the stitch on opposite side only.

Start stitching for the first buttonhole bar as shown above.
Take care not to pick the fabric below the bar.
Take care not to pick the fabric below the bar.

Buttonhole bar in progress.

Continue stitching the running stitch over the border as done before till another bar is reached.

Buttonhole bars are done and the work is ready for next step.........
Next post will be on how to cut the fabric and secure the borders with buttonhole stitch.
See all the posts related to Cutwork Embroidery here
Wednesday, 4 July 2012
Cutwork Embroidery
Link to the Cutwork embroidery project

A type of embroidery characterized by openwork patterns created by outlining shapes in tight buttonhole or satin stitches and cutting away the background fabric.
Cutwork embroidery is sometimes called “embroidered lace” because of its open appearance, but it is not considered to be true lace. Instead, cutwork is fabric made “lacy” by cutting away the ground. Finished holes are sometimes filled in with bars of buttonhole stitch.
Cutwork is one of the three main techniques used in whitework, along with drawn work, pulled threadwork, and needle lace.
The simplest form of cutwork contains small open areas, such as eyelets.
There are many different variations of cutwork.
Well known examples include :
French Richelieu embroidery -
Richelieu embroidery includes distinctive buttonhole stitch bars that cross the cut out areas.The connecting bars, instead of being left plain as they are in the Renaissance embroidery, are ornamented with picots.

English broderie anglaise-
Th is type of whitework includes motifs of flowers, leaves,and stems created entirely in eyelets

Portuguese Madeira work-
Madeira work is a form of Broderie anglaise, which consists chiefly of eyelet holes, as well as satin stitching and other cutwork techniques.

Scandinavian Hardanger embroidery
Hardanger is a Norwegian style of embroidery that uses satin stitch and blocks of drawn threads or cutwork.
Other types of white cutwork include :
Venetian (Italy) embroidery with its thickly padded buttonhole
stitching,

Spanish cutwork with turned-back hemmed satin stitch edges, and the heavily embroidered Colbert embroidery
Stay tuned for next post on Cutwork Embroidery tutorial.
Subscribe to:
Posts (Atom)