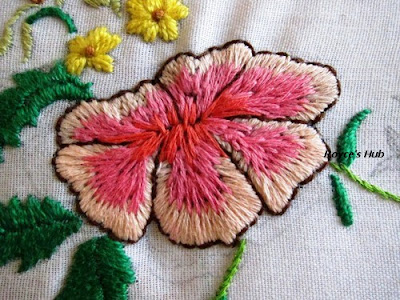
The correct use of this stitch and intelligent choice of colors give fabulous results.
Long and Short Stitch is an important stitch in Needle Painting.
The advantage of Long and Short Stitch over satin stitch is that , the former allows following of curvature of flower or leaf or anything that it is used on.
Long and Short Stitch is an important stitch in Needle Painting.
The advantage of Long and Short Stitch over satin stitch is that , the former allows following of curvature of flower or leaf or anything that it is used on.
I have used Long and Short Stitch to work this flower, my second attempt at Long and Short Stitch. I am pleased with the outcome.
The next one is my first attempt, not a very good one though. I had to outline the flower to give the petals its distinct look. But I should admit, I learned a lot from the first attempt.
Long and Short Stitch for Beginners
Here is the way I learned the Long and short stitch . This method of the stitch is for practice and to understand the stitch better.
I first made a graph with boxes drawn (as shown) on the cloth.
Long stitch = 1 cm
short stitch = 0.5 cm
( These measurements are not a rule and are only for illustrative purposes )
First Row
I started with green thread and made the long stitches 1 cm long , alternating with short stitches that were 0.5cm long
Second Row
Next I used yellow thread.
I DO NOT touch the long stitch .Instead, just extend the short stitches down, covering 0.5 cm length , so that the stitch is 1 cm long .
Note : hence forth all the stitches would be of same length , that is, 1 cm ( until except the last row where the space of 0.5 cm need to be filled)
The row is finished . You can see that the Long stitches of first row ( green) have become short stitches now after the second row ( yellow ) has been stitched.
Third Row
I used light brown colour.
This time I elongate only the long stitches of first row (green) which have become short after the second row was stitched.
The completed row.
In a similar way I have worked Row 4 and Row 5
Fourth Row
Fifth Row
Sixth Row
After the fifth row is worked , a space of 0.5 cm remains between each stitch which has been filled with the green thread here.
That finishes the long and short stitch filling of the rectangle.
TIPS:
1.I have used different colors for each row , but same color can be used for one or more rows as required .
2. Longer the stitches , better the shading and merging of different colors.
3. Stitches of different lengths also give a better shading. That is, long stitches of different lengths and subsequent short stitches would give more natural look while stitching flowers and other things.
4. Outline the flower or leaf before starting the Long and Short stitch to get a better finish ( which i didn't do in my project , so henceforth I shall be careful)
4. Outline the flower or leaf before starting the Long and Short stitch to get a better finish ( which i didn't do in my project , so henceforth I shall be careful)
More on Long and Short Stitch coming up. Stay tuned .........


Do you know that this is simply phantastic for me! I never really had the courage to start with long and short stitches because i could not find out where long and where short? Thanks to your diagramm I fully understand how it goes. Ah! I am sure I will start a project now, your pictures are really a great help to me. Thank you so much for sharing. Greetings from Germany
ReplyDeleteI am so glad that this tutorial was useful to you. All the best for your needlework projects.
DeleteRoyce,
ReplyDeleteThank you so very much for you tutorials. I am excited about starting the bunny project. I enjoyed the joining of yarn video as well. I must show that to a knitter that I know. What do you know about stump work?
Thank you , and I feel glad that you like the projects posted here.
DeleteI am very much interested in stumpwork and will surely post projects and details on the same.
Hi... your post is very fantastic and interesting.Basic embroidery stitches are the important for the design of any funny as like cartoons .Every younger likes this.Thanks for this tips.basic embroidery stitches
ReplyDelete¡¡¡¡¡¡¡Muchas gracias!. Su tutorial está muy bien explicado y las imágenes resultan de gran apoyo. Estoy aprendiendo a bordar y no encontraba cómo iniciar con esta puntada. Saludos desde Campeche, México
ReplyDeleteIt is so nice of you to explain it so clearly, I am sure to work in the same way as my project is going on , I was a little confused to proceed to get good results , thanks a lot.
ReplyDeleteHola, espectacular la explicación de puntadas largas y cortas en lineas rectas.
ReplyDeleteMi problema, es como hacer ese punto cuando son puntas inclinadas??. Podes publicar un tutorial. Muchas gracias
Thank you so much.
DeleteGlad that you liked this. I would trying it out soon and posting it
Over a decade later, and this post is still providing value! Thank you for breaking down this stitch in such an organized way. Cheers!
ReplyDeleteI'm so glad to see you again.
ReplyDeleteNice post!
ReplyDeletevery good
ReplyDeleteGreat stitching!
ReplyDeleteInformative blog!
ReplyDeleteGlad to see you!
ReplyDeleteSuperb!
ReplyDeleteLook pretty!
ReplyDeleteGorgeous Article
ReplyDeleteLong and short stitch techniques create such beautiful depth in embroidery! If you're looking to get custom designs embroidered on apparel, check out our embroidery services.
ReplyDeletegood job
ReplyDelete